Overview of the Navigation Bar
When you click into More > Document Signing you will notice that the dashboard has had a complete makeover.
There are a range of new features in the navigation bar that make it easier to oversee documents that are signed or pending signing.

- Sent displays all of your sent signing requests. You can order these signing requests by the document name, stage of signing, when it was sent, and when the signing request expires.
- My Hidden displays any files you have hidden from your Sent tab.
- All is only available to Admins and displays all of your team members' document signing requests. You can order these signing requests by the document name, stage of signing, when it was sent, and when the signing request expires.
- All hidden is only available to Admins. It allows them to see all hidden documents across the business.
- Admin view is only available to Admins or Standard users with Custom branding permissions. It allows them to custom brand how document signing requests are sent.
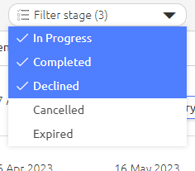
- Filter stage allows you to filter documents by the different stages they are at; In Progress, Completed, Declined, Cancelled or Expired. You can select multiple stages to filter.
- Search allows you to search by document name.
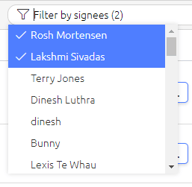
- Filter by signees allows you to filter your list by Signee name. You can select multiple signees.
Document Overview
When you send a document to be signed it will be stored in the document signing dashboard. From this dashboard there are a number of ways to see the progress of the signing process and to edit the signing process after the fact.
View the progress
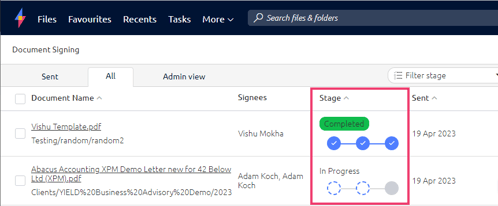
By hovering over the three circles in the Stage column, you can quickly view the progress of a document. If the circles are blue, this means that the process stage has been Completed. If the circles are grey, this means that the process stage has not been completed. The three stages are:
- Document Opened
- Document Signed
- Document Completed
View the Original or Completed Document
You can view the original document in SuiteFiles by clicking on the name of the document on the left. To open a PDF version of the signed document in a new tab by clicking View /Document. For documents completed after the signing dashboard release (17/04/23), this will take you to the _signed.pdf in the SuiteFiles folder location. Documents signed pre-release (17/04/23) will open up in a new tab in your browser.

If the document is not completed you will be directed to the original PDF in SuiteFiles.
Managing Signees when the document is not completed
Once you have sent a document out to sign and it is in the In progress stage, you still have the ability to manage the signees, expiry date, reminders and CC recipients.
Click Manage Signees

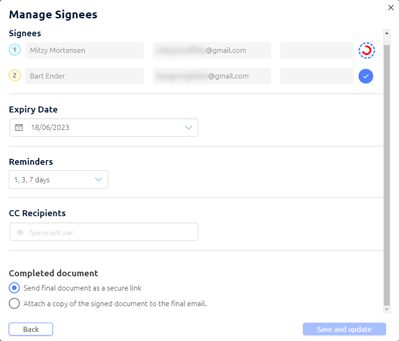
Signees: Signees and their email address are listed, and are in sequential order if this option has been selected. You can also view any 2-Factor-Authentication in the 3rd column of the Signees section.
To see which signees have signed the document, look at whether there is a blue tick on the far right of their name. If the signee has not signed, they will have a 3/4 red circle with blue dashes in a circle around it. You can also hover your mouse over the circles and it will show whether they have signed or not.
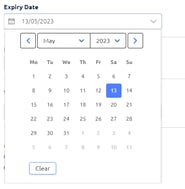
Expiry Date: You can view the document expiry date and can edit it by selecting a new date from the calendar drop-down.
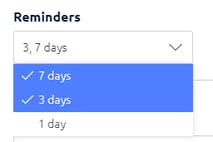
Reminders: Signing reminders are set to remind the signee after 1, 3 and 7 days. You can edit the number of reminders here. You can also select multiple reminder dates.
CC Recipients: You can add people to be CC'd into the final email once everyone has signed the document.
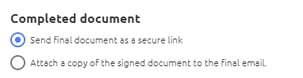
Completed Document: You can decide whether the completed document is sent as a secure link to all signing parties, or whether it is attached as a copy to the final email.
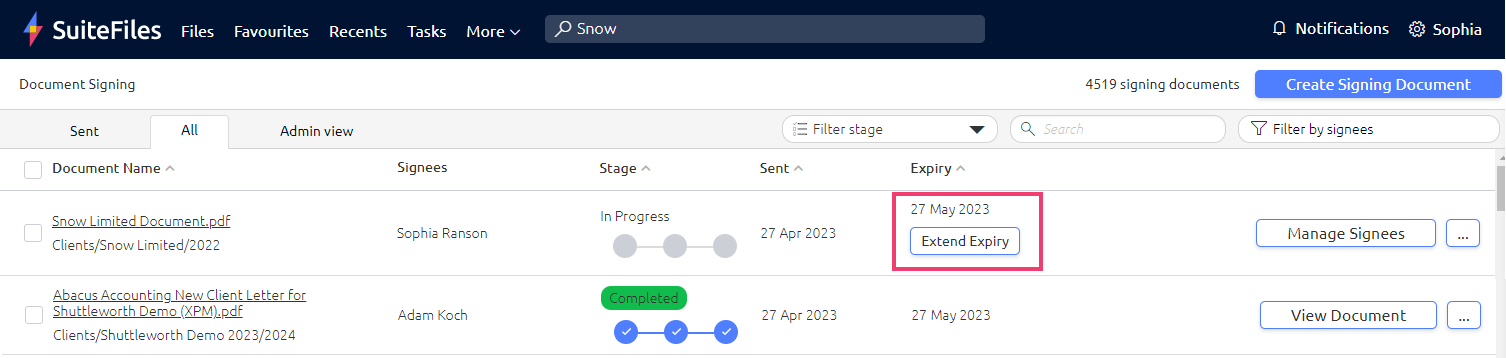
Extending the Expiry
If a document has not been signed in the set time, you can extend the expiry date by clicking Extend Expiry.
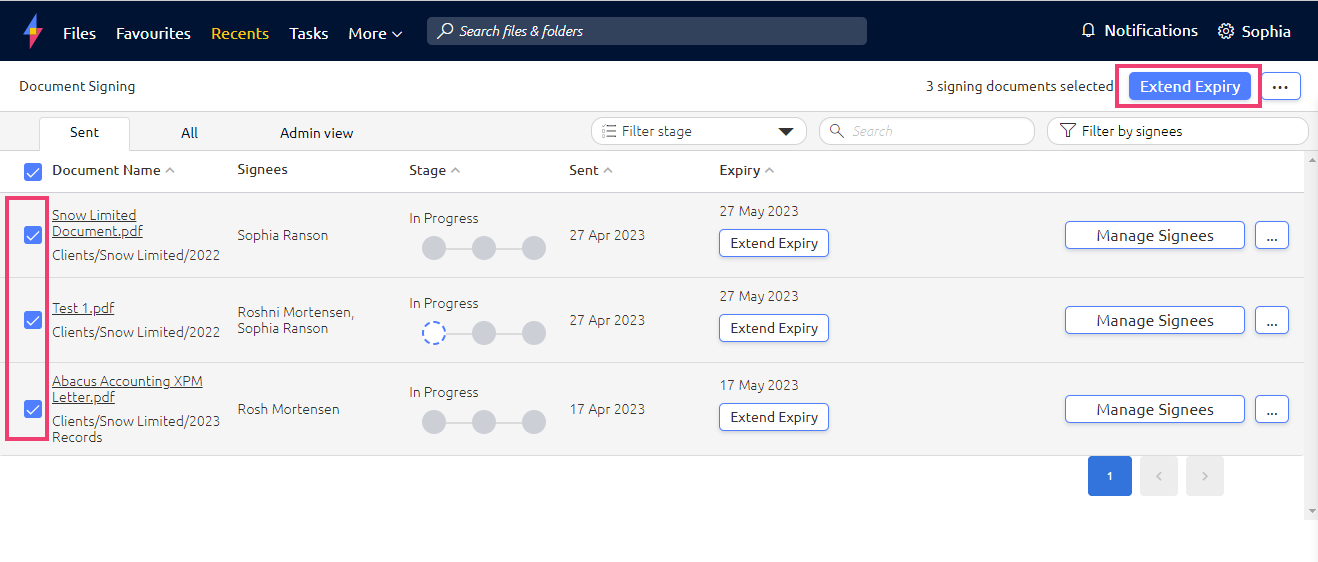
The document signing dashboard now allows bulk actions for extending the expiry. Select multiple documents using the checkboxes on the left, and click Extend Expiry in the top right corner.
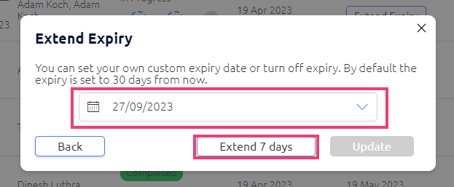
Once you have clicked Extend Expiry you will be prompted to either choose a date from the calendar drop-down, or to extend for 7 days.
Make sure to click Update once you have chosen the new expiry date. An email will be sent to all signees who have not yet signed the document.
Tip: If you extend multiple documents for 7 days, they will each be extended for 7 days. E.g. Doc 1 expires on 28 April 2023 and doc 2 expires on 29 April 2023. After extending 7 days, doc 1 expires on 5 May 2023 and doc 2 expires on 6 May 2023.
Selecting an expiry date from the calendar will mean all selected documents get extended to that date.
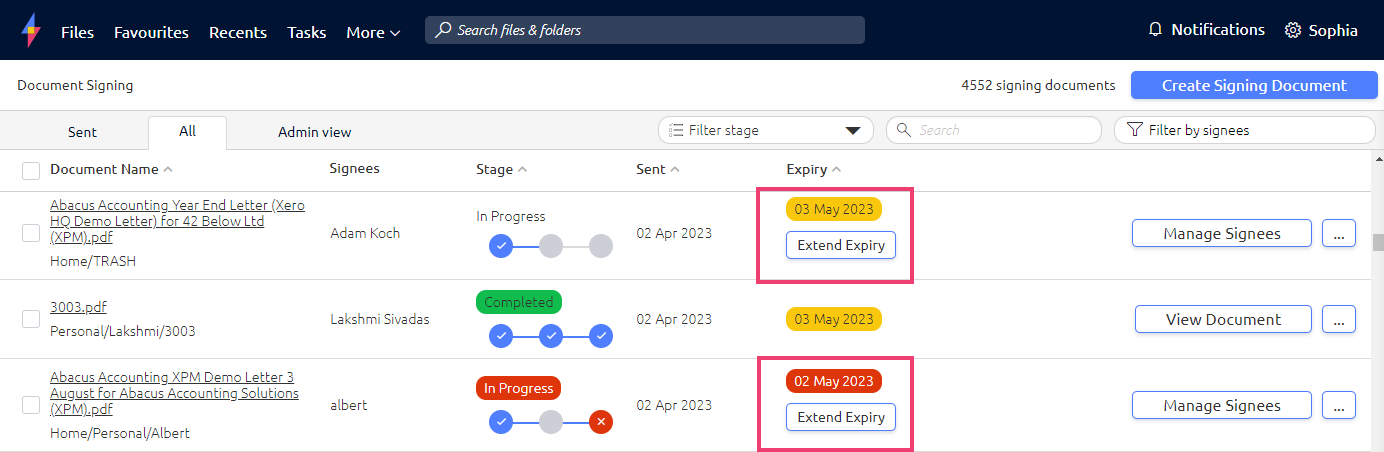
If the document is within 5 days of expiring, the date will be shown in yellow. If the date has expired, the date will be shown in red.
Other Options
To see the other options you have for each signing document click the ellipses next to View Document or Manage Signees. There are different options that will become available depending on the document stage.
In Progress
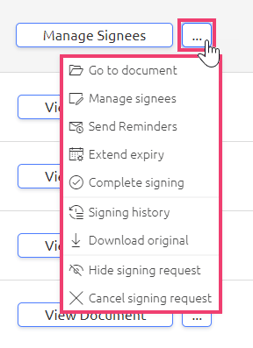
- Go to document: For In Progress files, this will take you to the original PDF.
- Manage signees: Another way to get to the Manage Signees screen.
- Send Reminders: Available for In Progress files, this allows you to edit how many and when reminders are sent.
- Extend Expiry: This allows you to extend the expiry. See here for more details.
- Complete signing: On a document that hasn't been signed by all recipients, there is the option to manually complete signing. This is under the ellipses as Complete Signing. Type COMPLETE into the box provided to complete the document, even if all people have not yet signed. All signatures added to the document up to that point are retained.

Documents that have been manually completed will show up as "manual complete" in the signing history.- Signing history: The signing history can act as a signing certificate for organisations that require one. It includes a detailed breakdown of who sent the document to be signed and who has signed the document. These details include dates, action taken and IP addresses.
- Download original: This allows you to download the original PDF.
- Hide signing request: Replaces the old Archive function. This hides the document from your Sent tab and moves it to the My Hidden tab.
- Cancel Signing Request: Cancels the document and will update any remaining signees.
Completed Document
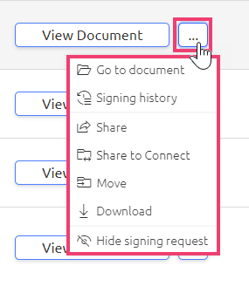
- Go to document: For Completed files, this will take you to the _signed.pdf version in the SuiteFiles folder location.
- Signing history: The signing history can act as a signing certificate for organisations that require one. It includes a detailed breakdown of who sent the document to be signed and who has signed the document. These details include dates, action taken and IP addresses.
- Share: Allows you to share the file with a colleague for their review or approval.
- Share to Connect: This allows you to share the document with external users via the SuiteFiles Connect portal.
- Move: Allows you to move the file to another location in SuiteFiles.
- Download: This will download the signed document in PDF form.
- Hide signing request: Replaces the old Archive function. This hides the document from your Sent tab and moves it to the My Hidden tab.
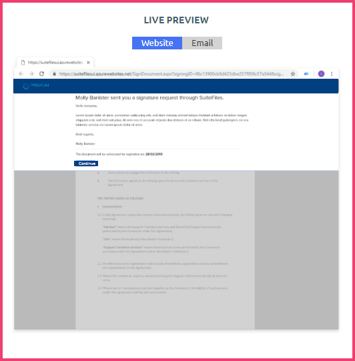
Admin view
In this update we have relocated the custom branding to be in the Admin view tab. If can access this if you are an Admin or a Standard user with Custom branding permissions. Here, you can change the custom branding on your document signing emails and the document signing web interface.
- Primary Colour - This changes the colour of the header background colour of the email signing interface
- Secondary Colour - This changes the colour of the buttons that are used in the emailing singing request.
- Logo - This enables you to customise your email branding by adding your company's logo.
- Live Preview - This allows you to preview what the email signing request and the document signing web interface will look like from the customers point of view.
Make sure that after you have made any edits, to click Save Custom Branding.